5. Virtual environments
Tutorials on how to run SnakeChunks workflows in virtual environments or virtual machines (VM).
These protocols were developed on a Unix computer, with the OS LMDE and a 64-bit architecture. The virtual machines are developed with the Ubuntu 14.04 OS.
Last update: 17/05/09
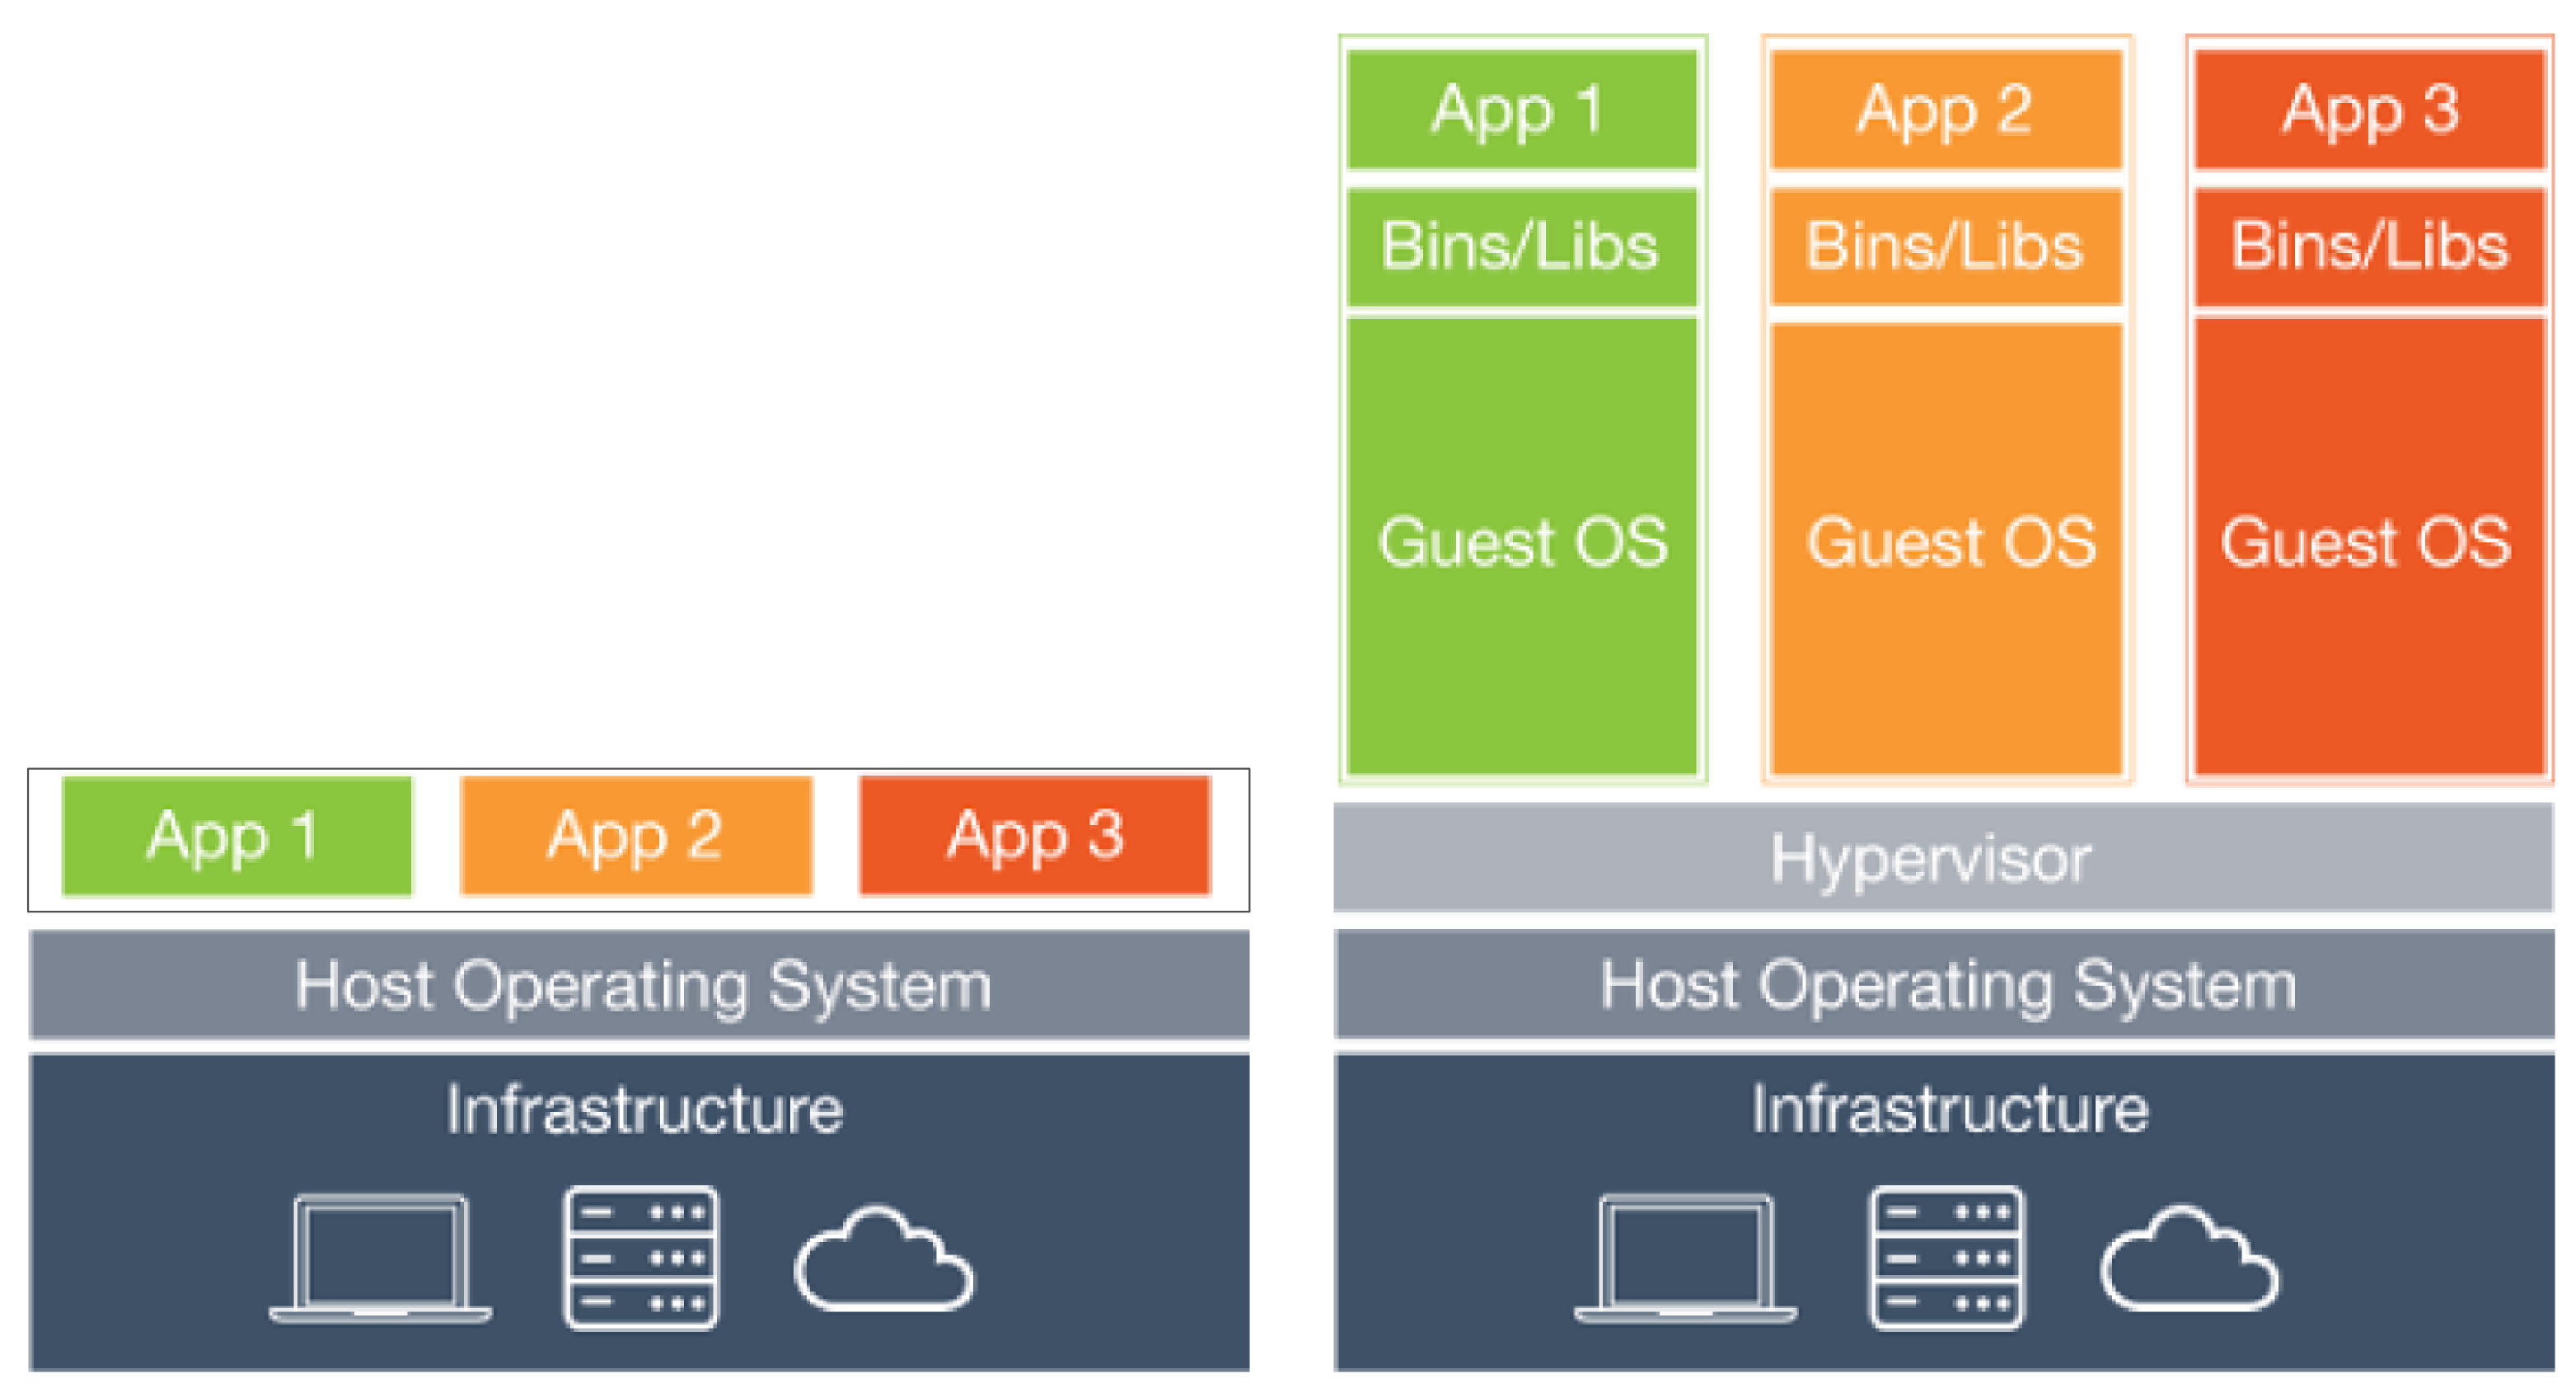
In computing, a virtual machine (VM) is an emulation of a computer system. Virtual machines are based on computer architectures and provide functionality of a physical computer. Their implementations may involve specialized hardware, software, or a combination. Source: Wikipedia
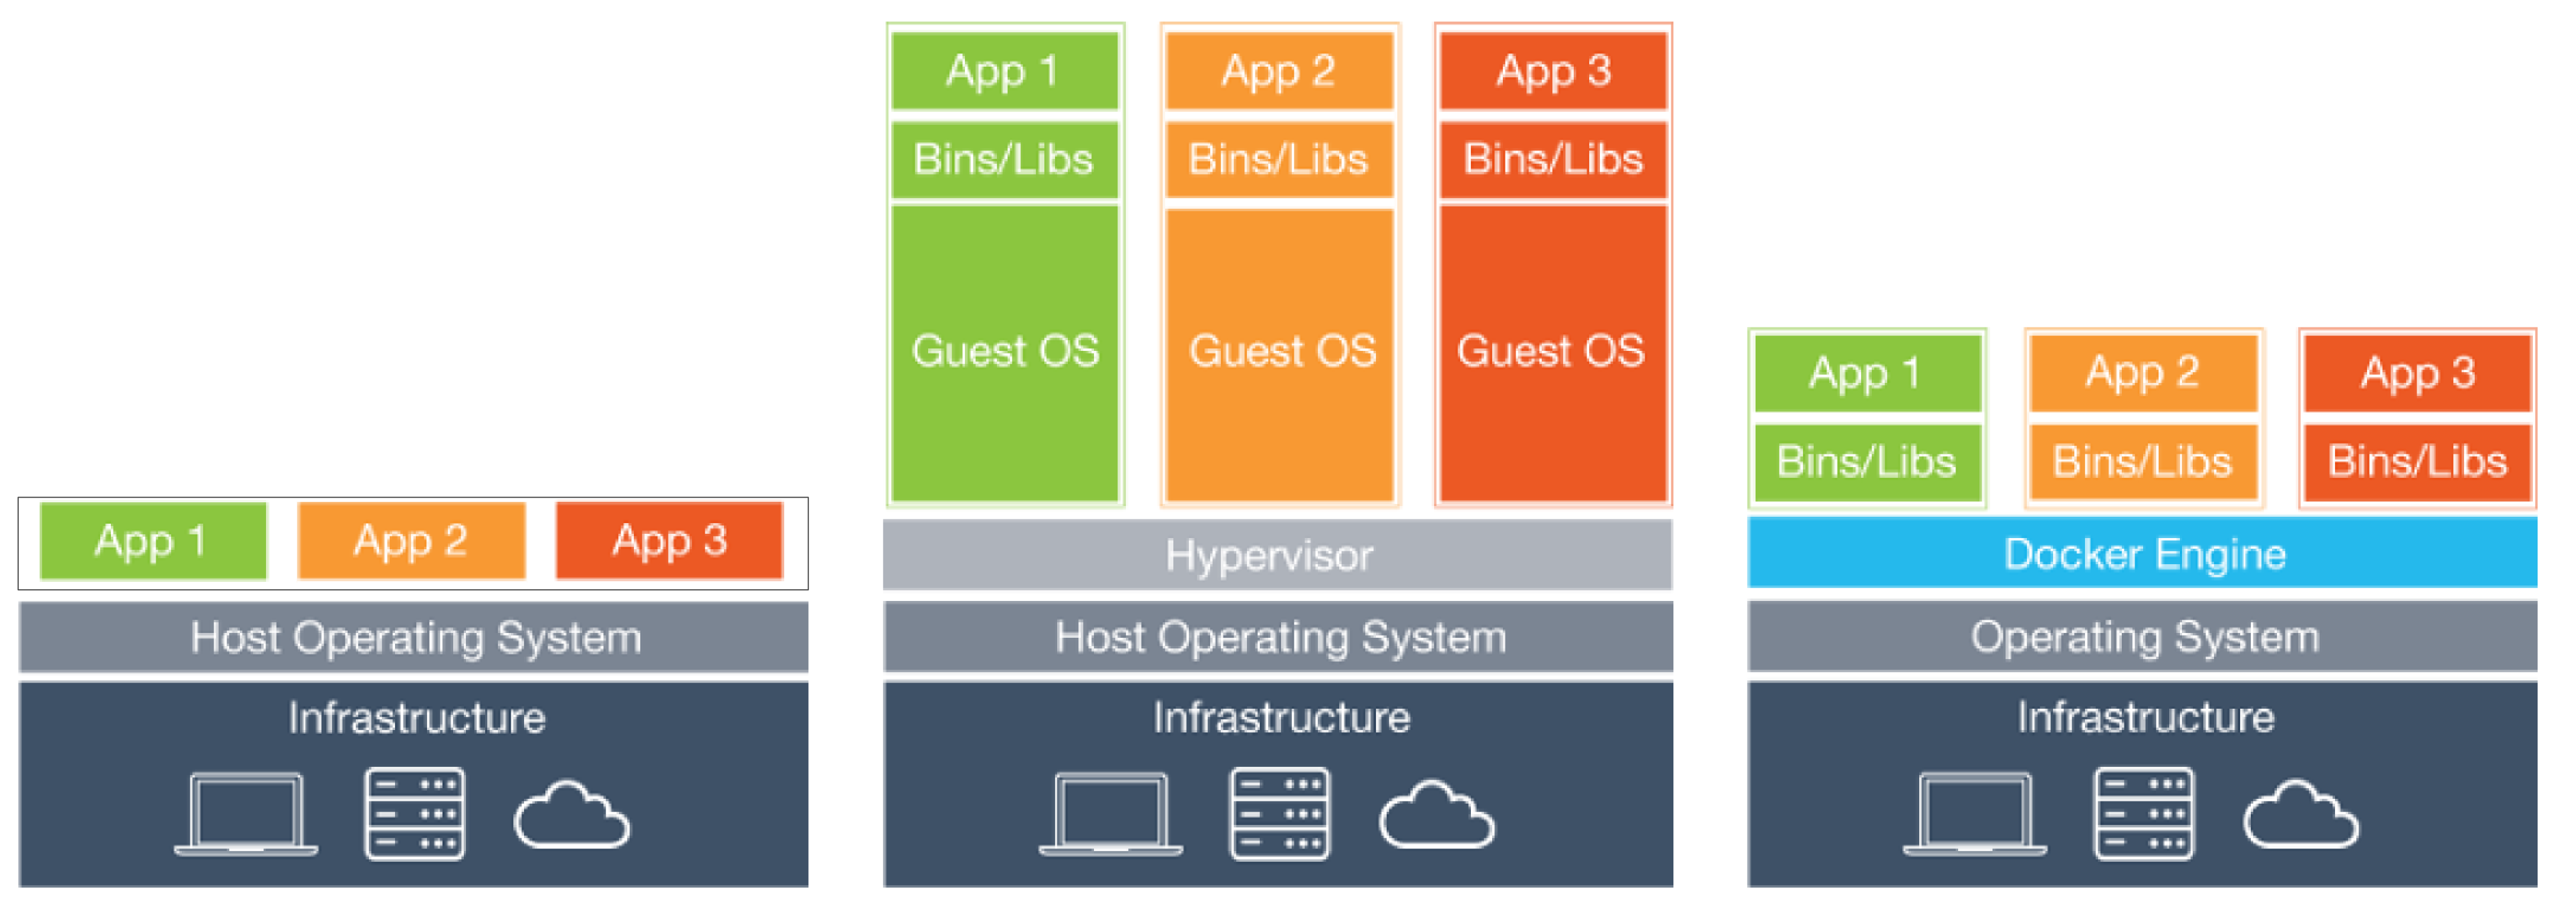
Diagram of a physical machine vs a virtual machine:
5.1. IFB cloud
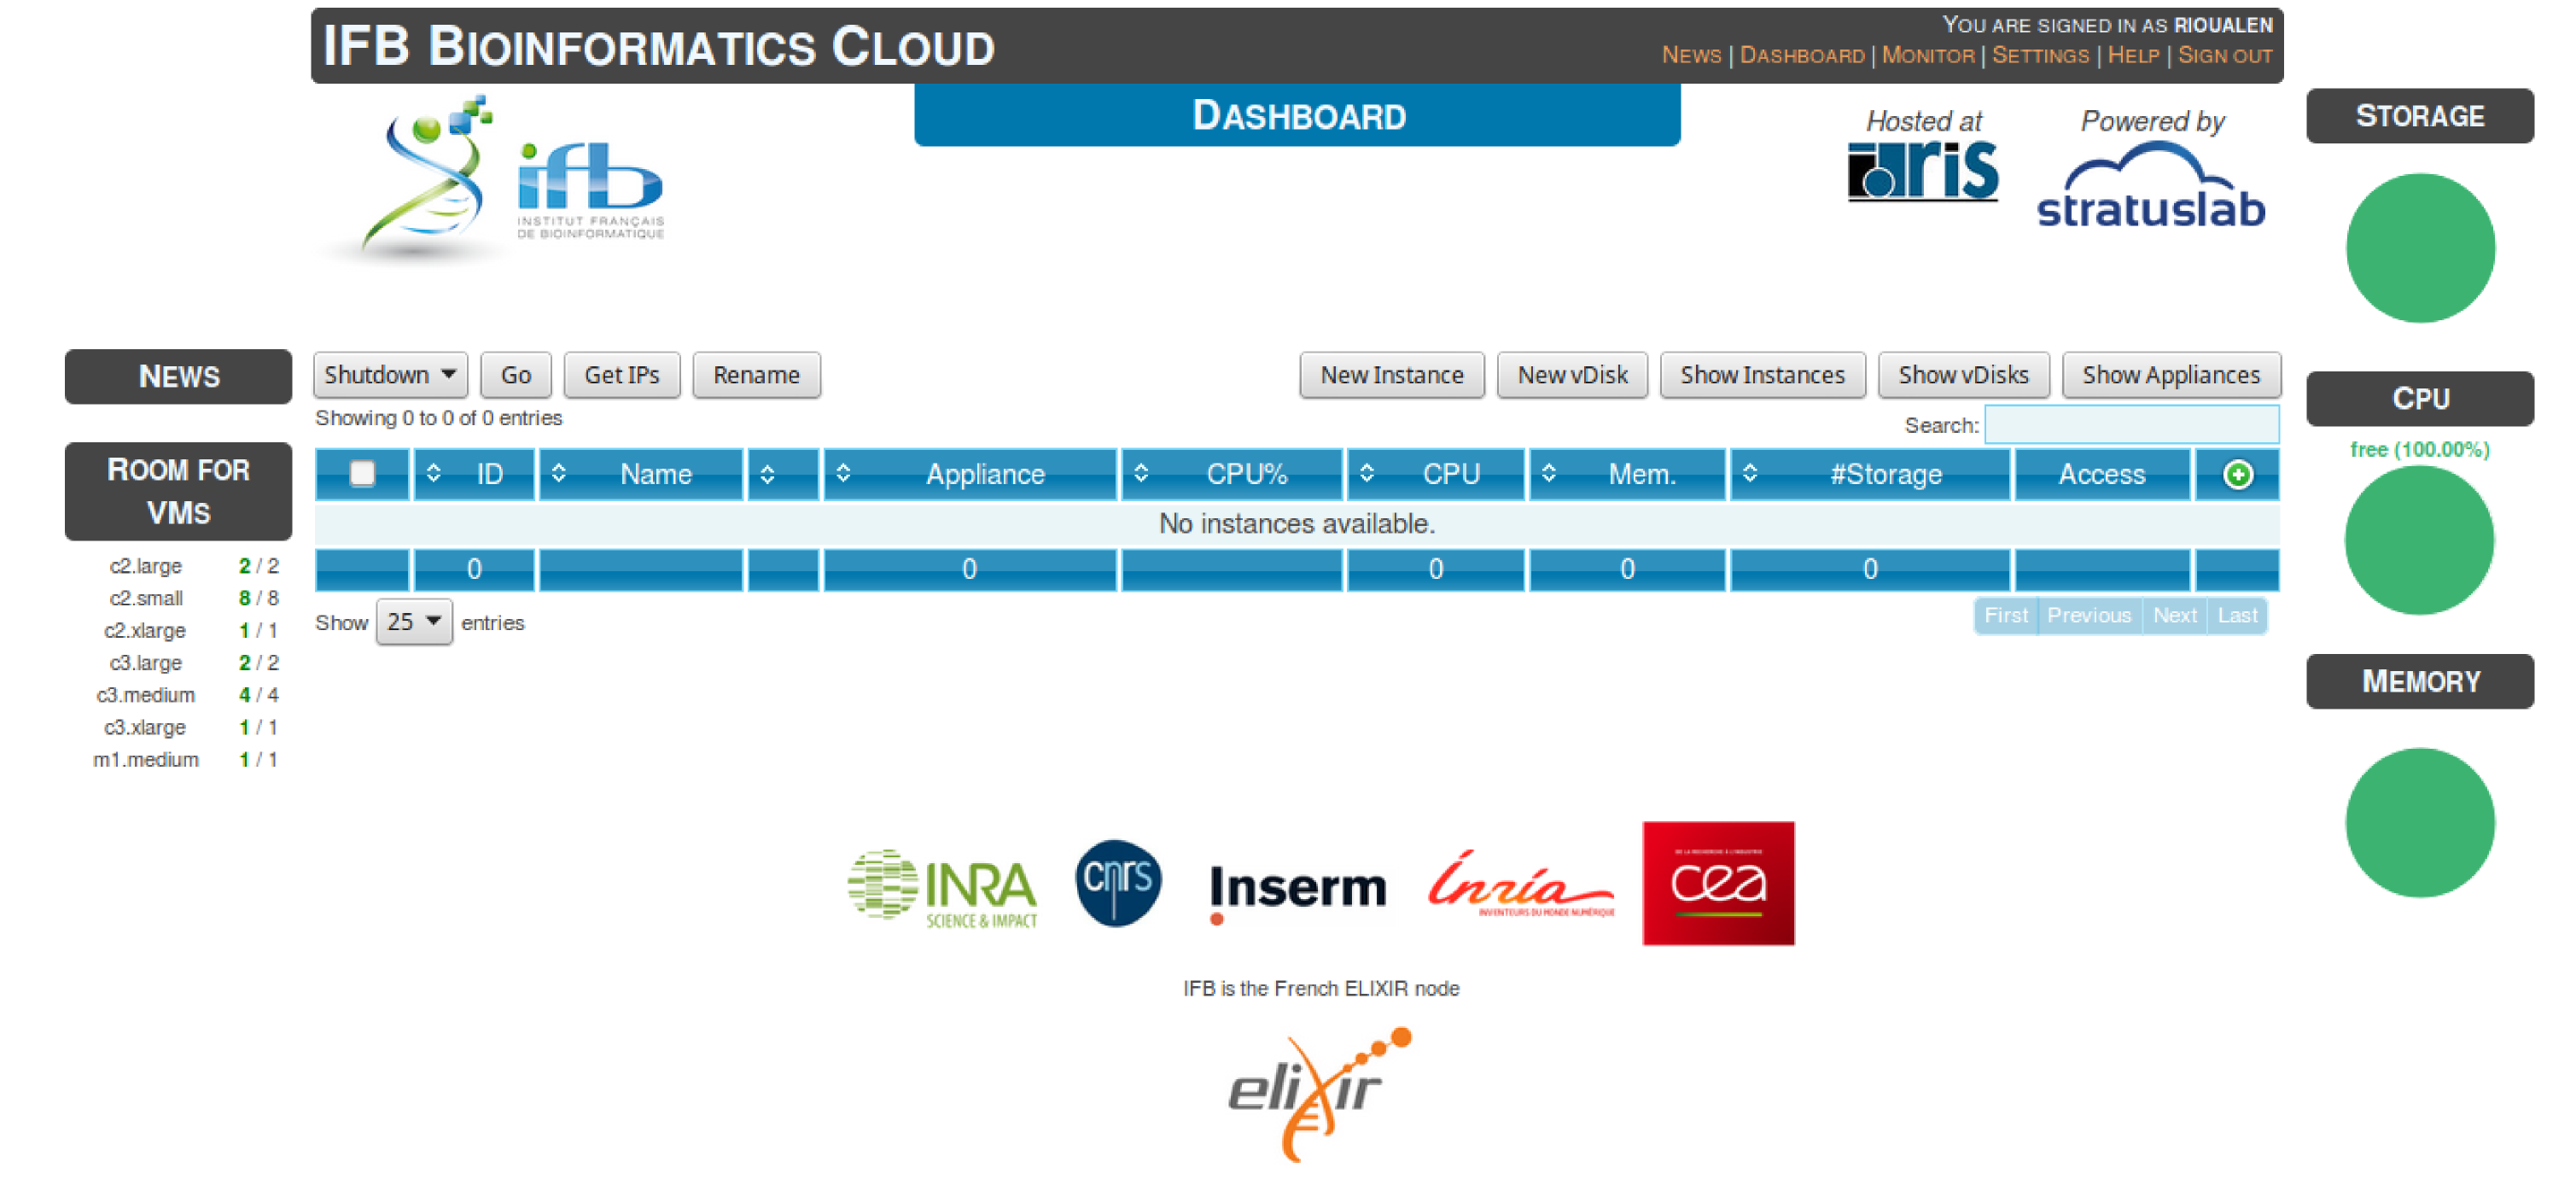
5.1.1. IFB cloud utilities
The French Bioinformatics Institute (IFB) cloud provides users with a number of bioinformatics facilities, under the form of ready-to-use appliances. A cloud appliance is a template or a virtual machine (VM) built with a bundle of scientific or utility software components that are already configured. Several appliances are dedicated to special fields of bioinformatics, such as proteomics, genomics… Some of them come with an HTML interface, such as Galaxy or RSAT.
The cloud also provides “basic” Ubuntu or CentOS appliances. Provided you hold a developper account, it allows you to instantiate a virtual machine, setup your own tools, and register it as a new appliance to be used again later on and even shared with other cloud users.
The official website is still under development. However, here are a few useful links:
The first parts of this tutorial will explain you how to use the IFB cloud for general purposes.
For a specific use of the SnakeChunks appliance, you should refer yourself to this section.
5.1.1.1. User account creation & configuration
- Using the IFB cloud facilities requires to have a user account. Register here.
- Once your account has been validated, you can login.
- In order to be able to access your instances through SSH, you should register your SSH public key in your account settings, through the dashboard.
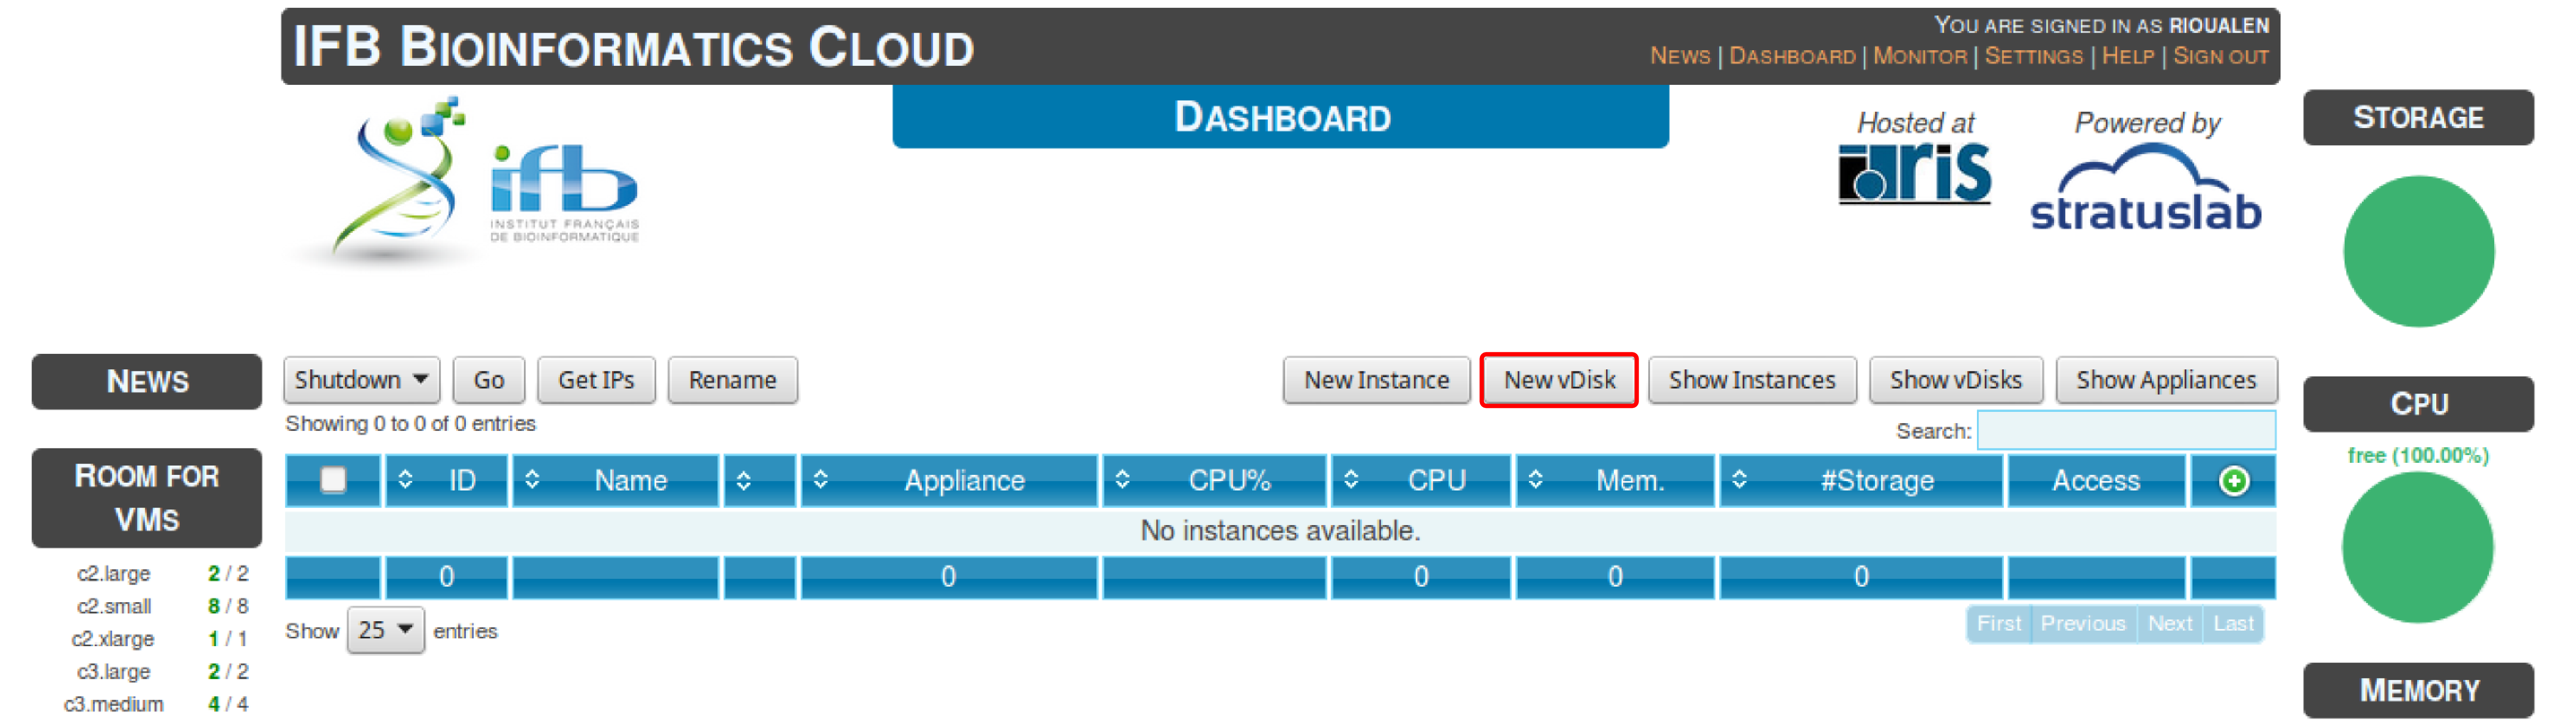
5.1.2. Virtual disk creation
Appliances usually have a limited amount of disk space (up to 10 or 20Go). If the instance to be run necessitates disk space, you have to create a virtual disk (vDisk) prior to launching it. Depending on the type of account that you have, you’ll have a certain amount of storage space available. This space can be divided into as many vDisks as you want.
When instantiating an appliance, you can chose to attach one of these vDisks to the virtual machine.
- Click New vDisk button.
- Enter a size (whole number equating to the amount of Go needed).
- Name it.
5.1.3. Creation of an instance
Creating an instance consists in instanciating an existing appliance. It creates a virtual environment that has the same contents as the appliance chosen, and that is accessible through ssh from your local host.
- Click New Instance button.
- Choose an appliance in the drop-down menu. You may use the filter menu in order to look for a specific tool.
- Name your virtual machine.
- Choose the amount of CPU and RAM to grant the VM.
- Attach the vDisk.
- Click Run.
change screencap
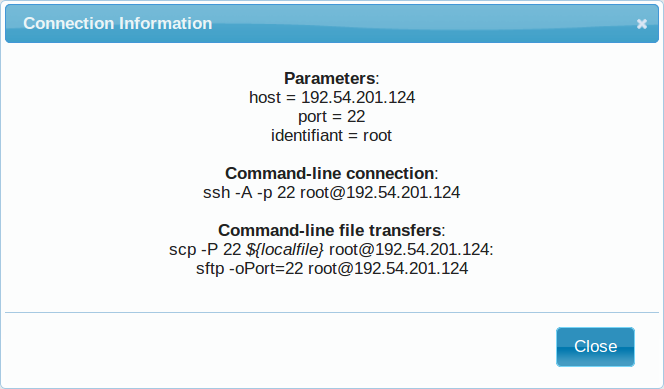
- After a few seconds, you may refresh the page until the newly created instance shows up on the dashboard. Clicking on the ssh mention in the Access column will give you the commands to access your virtual machine.

- If the appliance has an HTTP interface, a link will also be provided in the Access column.
- Connect to your VM by commandline.
# Replace XXX by the IP of your instance
ssh -A -p 22 root@192.54.201.XXX
5.1.4. Creation of an appliance
Creating your own appliance can be as simple as instantiating an existing one. You just need to chose a “base” to build it on.
- Click New Instance button.
- Choose the appliance Ubuntu 14.04 IFB (16-12).
- Name your instance.
- Check Create appliance.
- Choose the amount of CPU and RAM to grant the VM.
- Attach the vDisk.
- Click Run.
- Refresh the page. Your appliance should appear in orange because of the creation mode you selected. You can now click on the ssh column to see the ssh parameters. It should look like this:

Connect to your VM by commandline.
# Replace XXX by the IP of your instance
ssh -A -p 22 root@192.54.201.XXX
Once you’re connected to your appliance, you can install all the programs that you want. You can check out this section for a manual on how to install NGS tools. Beware that the amount of disk space of the appliance itself is limited!
Later on, you can ask an admin from the IFB cloud to register the appliance, in order for it to become available to other cloud users.
5.1.5. First connection to the instance
5.1.5.1. Data management
5.1.5.1.1. Virtual disk
By default, if a vDisk has been attached to the VM, it is mounted under
/root/mydisk.
5.1.5.1.2. Transfers
You can transfer data from your local computer to the VM using commands provided under Access > ssh:
# Replace XXX by the IP of your instance
scp -P 22 ${localfile} root@192.54.201.XXX:
sftp -oPort=22 root@192.54.201.XXX
Another way is to use rsync:
# Replace XXX by the IP of your instance
rsync -ruptvl ${localfile} root@192.54.201.XXX:/root/mydisk/
5.1.5.2. Software installation
Once you’re connected to the VM through ssh, you can install any
program just the way you would do it locally (see tutorials in this
directory
for instance).
5.1.5.3. Configuration
5.1.5.3.1. User account
Create user account and grant it sudo privileges (followed procedure here).
5.1.5.3.2. Shell coloring
nano ~/.bashrc
Fetch following paragraph and uncomment command force-color.
# uncomment for a colored prompt, if the terminal has the capability; turned
# off by default to not distract the user: the focus in a terminal window
# should be on the output of commands, not on the prompt
force_color_prompt=yes
source ~/.bashrc
5.1.6. Using the SnakeChunks appliance
5.1.6.1. Requirements
User account creation & configuration
- Using the IFB cloud facilities requires to have a user account. Register here.
- Once your account has been validated, you can login.
- In order to be able to access your instances through SSH, you should register your SSH public key in your account settings, through the dashboard.
5.1.6.2. Virtual disk creation
Appliances usually have a limited amount of disk space (up to 10 or 20Go). If the instance to be run necessitates disk space, you have to create a virtual disk (vDisk) prior to launching it.
Check out this section for details.
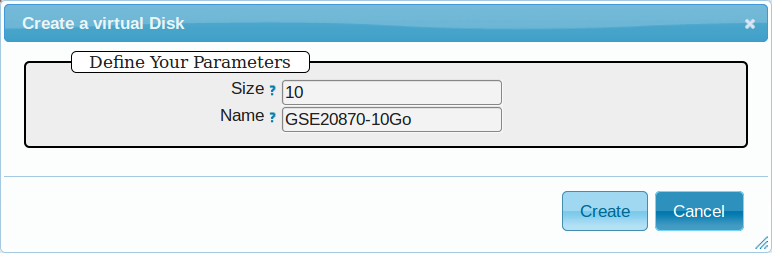
- Click New vDisk button.
- Enter a size (whole number equating to the amount of Go needed).
- Name it (e.g.
GSE20870-10Gb, the ID of the Gene Expression Omnibus series that will be stored on the virtual drive).
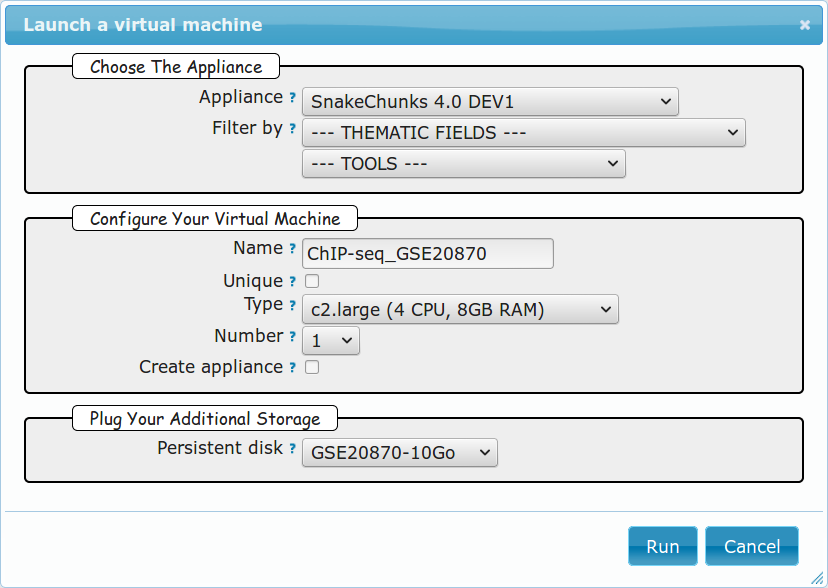
5.1.6.3. Creation of an instance
- Click New Instance button.
- Choose appliance SnakeChunks 4.0 in the drop-down menu.
- Name your VM.
- Choose the amount of CPU and RAM to grant the VM.
- Attach the vDisk.
- Click Run.
- After a few seconds, you may refresh the page until the newly created instance shows up on the dashboard. Clicking on the ssh mention in the Access column will give you the commands to access your virtual machine.
5.1.6.4. Connection to the device
Open a terminal on your host computer and type in:
# Replace XXX by the IP of your instance
ssh -A -p 22 root@192.54.201.XXX
5.1.6.5. Download source data
On the IFB cloud VM, the vDisk is automatically attached and mounted by
default under /root/mydisk, or ~/mydisk.
Here we create a folder to store the source data files and the files that will results from the execution of our workflow.
We also create a link to the SnakeChunks library.
ANALYSIS_DIR=${HOME}/mydisk/ChIP-seq_SE_GSE20870
mkdir -p ${ANALYSIS_DIR}
cd ${ANALYSIS_DIR}
ln -s ${HOME}/SnakeChunks SnakeChunks
5.1.6.5.1. Download data
The following commands will download the raw files from the GEO database, and create the folders to organize them properly.
wget --no-clobber ftp://ftp-trace.ncbi.nlm.nih.gov/sra/sra-instant/reads/ByExp/sra/SRX%2FSRX021%2FSRX021358/SRR051929/SRR051929.sra -P ${ANALYSIS_DIR}/data/GSM521934
wget --no-clobber ftp://ftp-trace.ncbi.nlm.nih.gov/sra/sra-instant/reads/ByExp/sra/SRX%2FSRX021%2FSRX021359/SRR051930/SRR051930.sra -P ${ANALYSIS_DIR}/data/GSM521935
5.1.6.5.2. Download reference genome & annotations
The following commands will download the required genome files in a specific directory:
- fasta file of the reference genome
- gff3 annotation file
- gtf annotation file
wget -nc ftp://ftp.ensemblgenomes.org/pub/fungi/release-30/fasta/saccharomyces_cerevisiae/dna/Saccharomyces_cerevisiae.R64-1-1.30.dna.genome.fa.gz -P ${ANALYSIS_DIR}/genome
wget -nc ftp://ftp.ensemblgenomes.org/pub/fungi/release-30/gff3/saccharomyces_cerevisiae/Saccharomyces_cerevisiae.R64-1-1.30.gff3.gz -P ${ANALYSIS_DIR}/genome
wget -nc ftp://ftp.ensemblgenomes.org/pub/fungi/release-30/gtf/saccharomyces_cerevisiae/Saccharomyces_cerevisiae.R64-1-1.30.gtf.gz -P ${ANALYSIS_DIR}/genome
gunzip ${ANALYSIS_DIR}/genome/*.gz
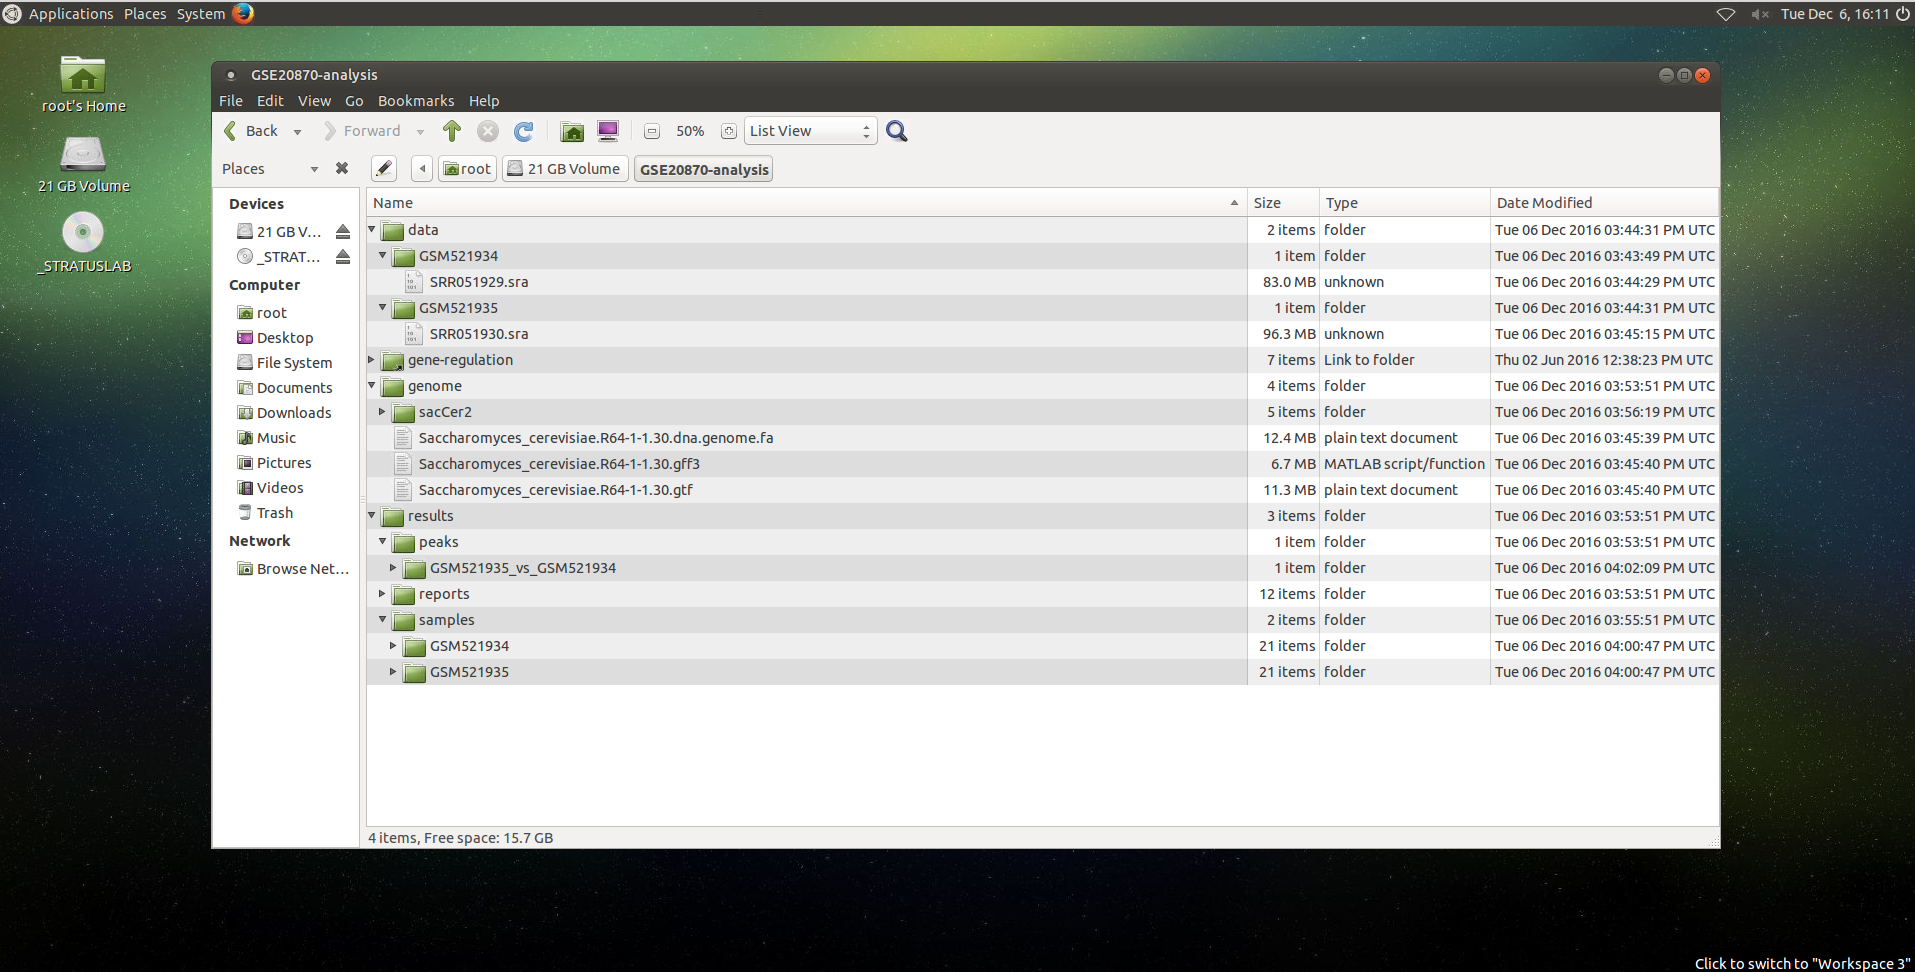
Your file organization should now look like this:

5.1.6.6. Run the workflow
You can use the option -n to make a dry run.
cd  ${ANALYSIS_DIR}
snakemake -p -s SnakeChunks/scripts/snakefiles/workflows/import_from_sra.wf --configfile SnakeChunks/examples/ChIP-seq_SE_GSE20870/config.yml -n
If there is no error, you can procede with the analysis:
# This workflow extracts .fastq files from the .sra archives
snakemake -p -s SnakeChunks/scripts/snakefiles/workflows/import_from_sra.wf --configfile SnakeChunks/examples/ChIP-seq_SE_GSE20870/config.yml
# This workflow performs quality check and trimming on the raw data
snakemake -p -s SnakeChunks/scripts/snakefiles/workflows/quality_control.wf --configfile SnakeChunks/examples/ChIP-seq_SE_GSE20870/config.yml
# This workflow perform a classic ChIP-seq analysis, including mapping, peak-calling and motif search, using 4 CPU
snakemake -p -j 4 -s SnakeChunks/scripts/snakefiles/workflows/ChIP-seq.wf --configfile SnakeChunks/examples/ChIP-seq_SE_GSE20870/config.yml
Using 4CPU & 8Go of RAM, the workflows take ~30mn to complete.
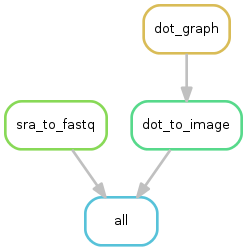
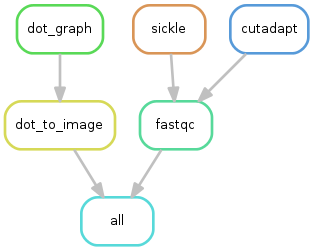
Congratulations! You just executed these wonderful workflows:

5.1.6.7. Visualizing results
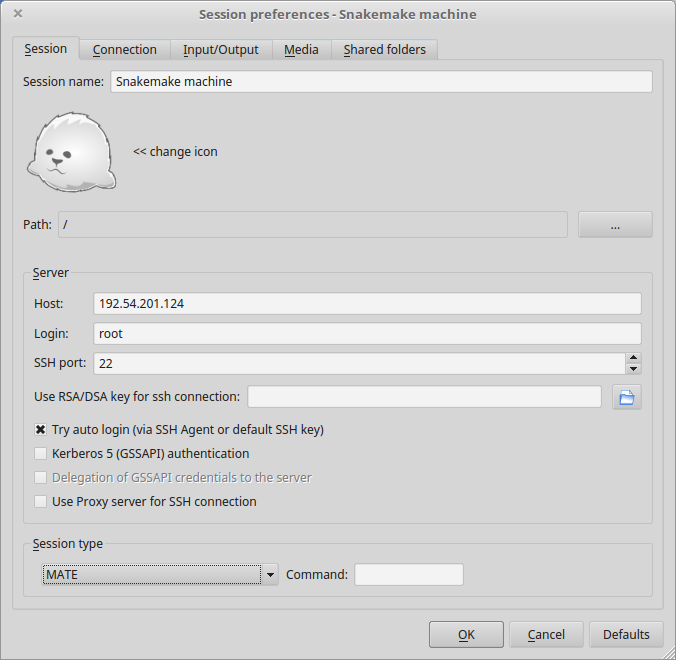
5.1.6.7.1. Install and run the X2Go client on your host computer
The Virtual Machine created on the IFB cloud doesn’t have a graphical interface, but it contains the X2GO software. We’re gonna use it to create a distant desktop to visualize the results from the host machine.
- Install the x2go client and launch it from your local computer.
sudo apt-get install x2goclient
x2goclient
- Create a new session using the Mate desktop.
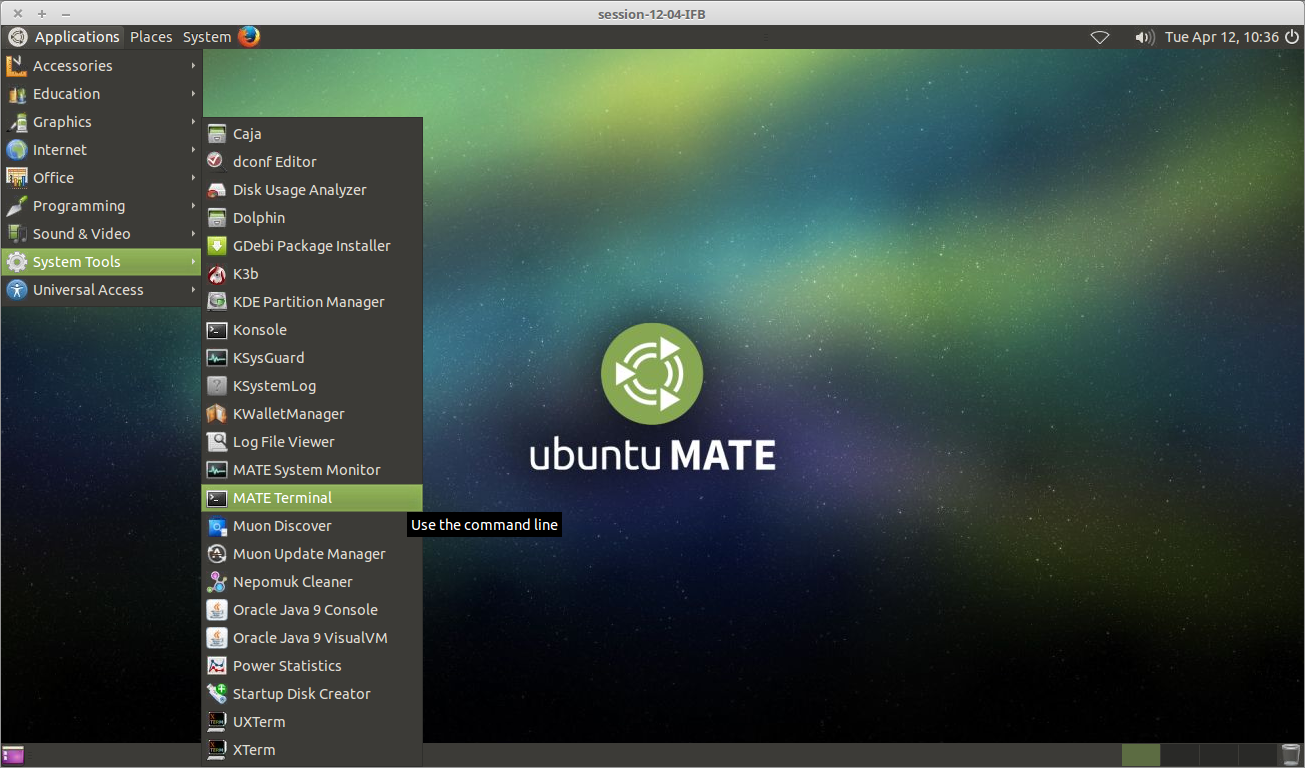
- The session now appears on the right panel. Just click it to lauch it!
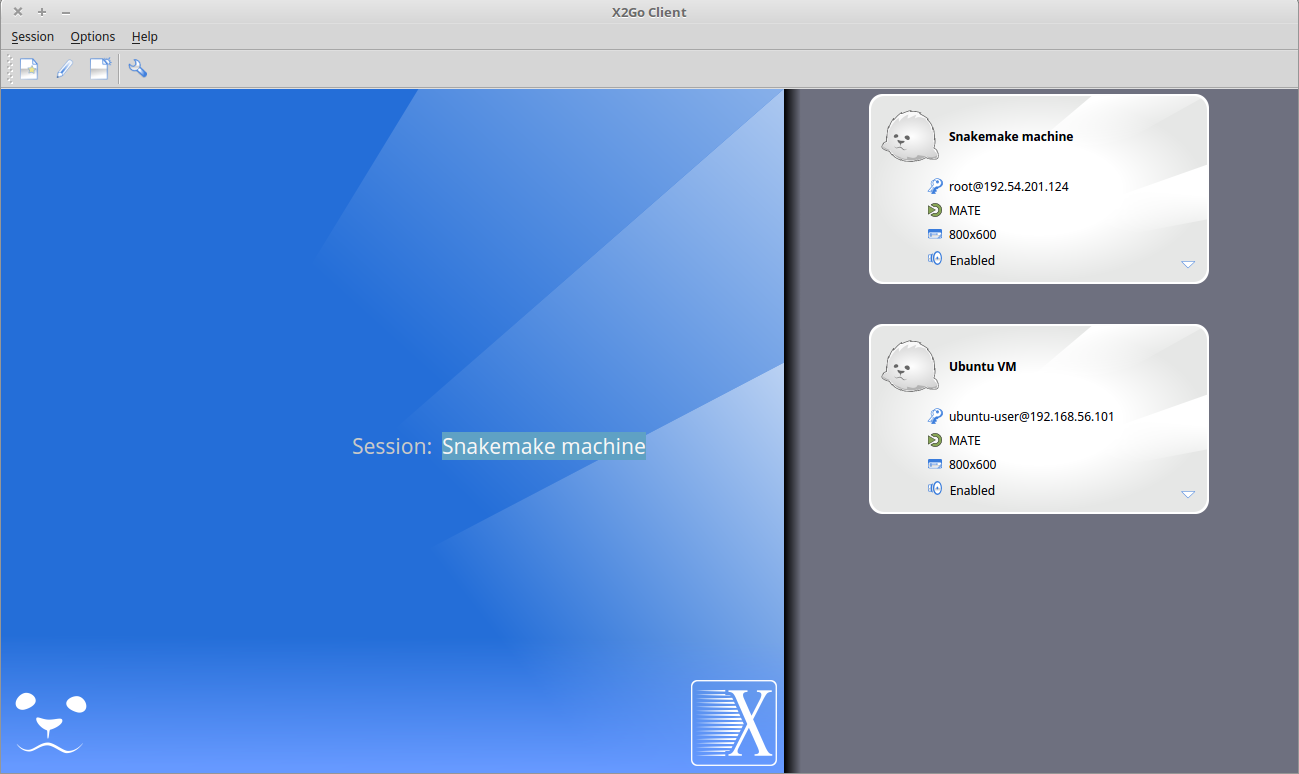
- You should be now on the virtual desktop!
Note: you may need to change your keyboard settings
- Go to System > Preferences > Keybords
- Click on tab Layouts
- Add and/or remove desired keyboards
5.1.6.7.2. Visualize results
The result files should be organized like this:
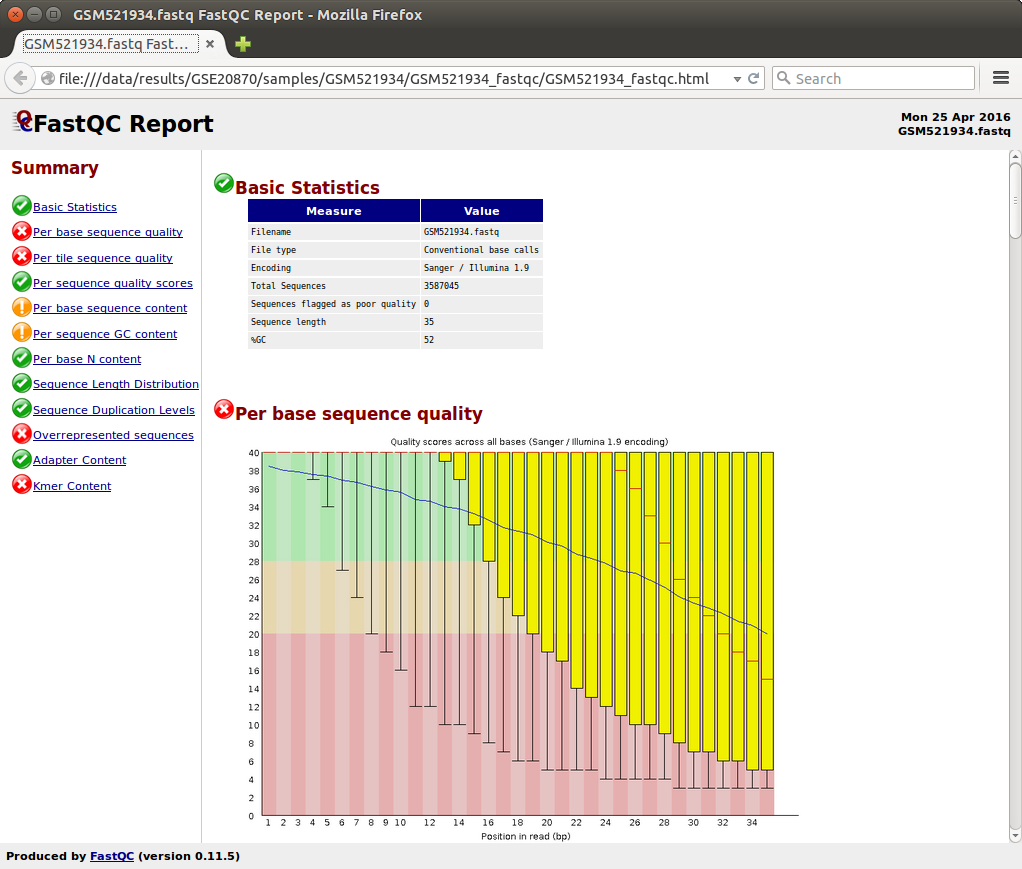
FastQC
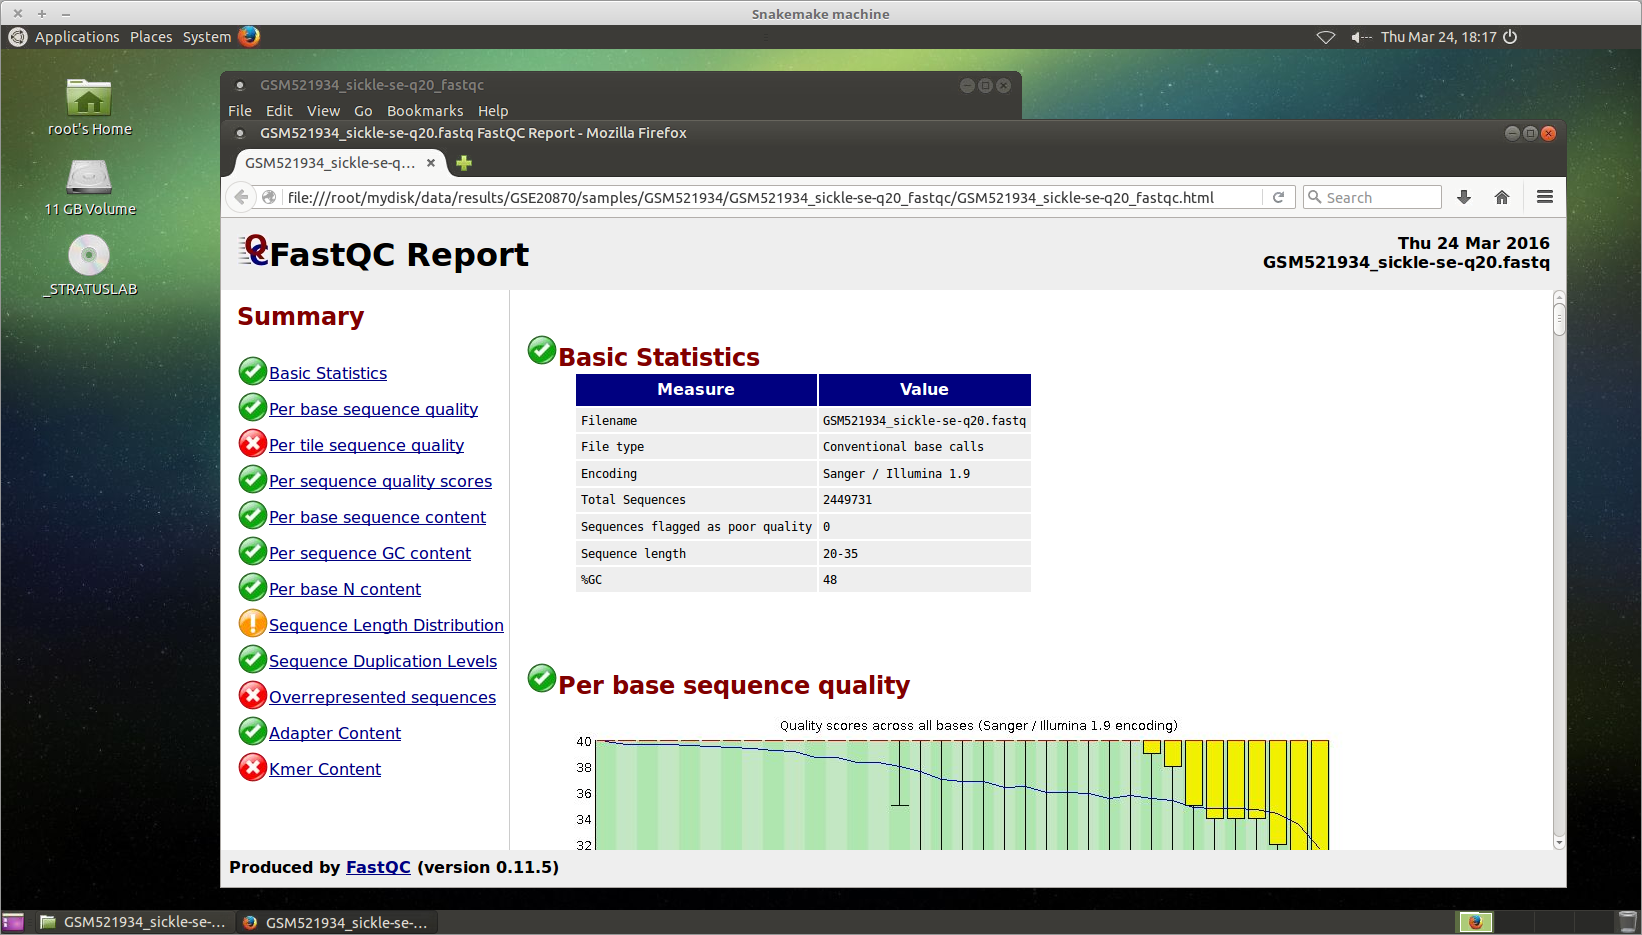
You can visualize the FastQC results using firefox or any other
navigator. Fetch the html files located in the sample directories.
Before trimming:
firefox /root/mydisk/ChIP-seq_SE_GSE20870/fastq/GSM521934/GSM521934_fastqc/GSM521934_fastqc.html
firefox /root/mydisk/ChIP-seq_SE_GSE20870/fastq/GSM521935/GSM521935_fastqc/GSM521935_fastqc.html
After trimming with Sickle:
firefox /root/mydisk/ChIP-seq_SE_GSE20870/fastq/GSM521934/GSM521934_sickle-se-q20_fastqc/GSM521934_sickle-se-q20_fastqc.html
firefox /root/mydisk/ChIP-seq_SE_GSE20870/fastq/GSM521935/GSM521935_sickle-se-q20_fastqc/GSM521935_sickle-se-q20_fastqc.html
IGV
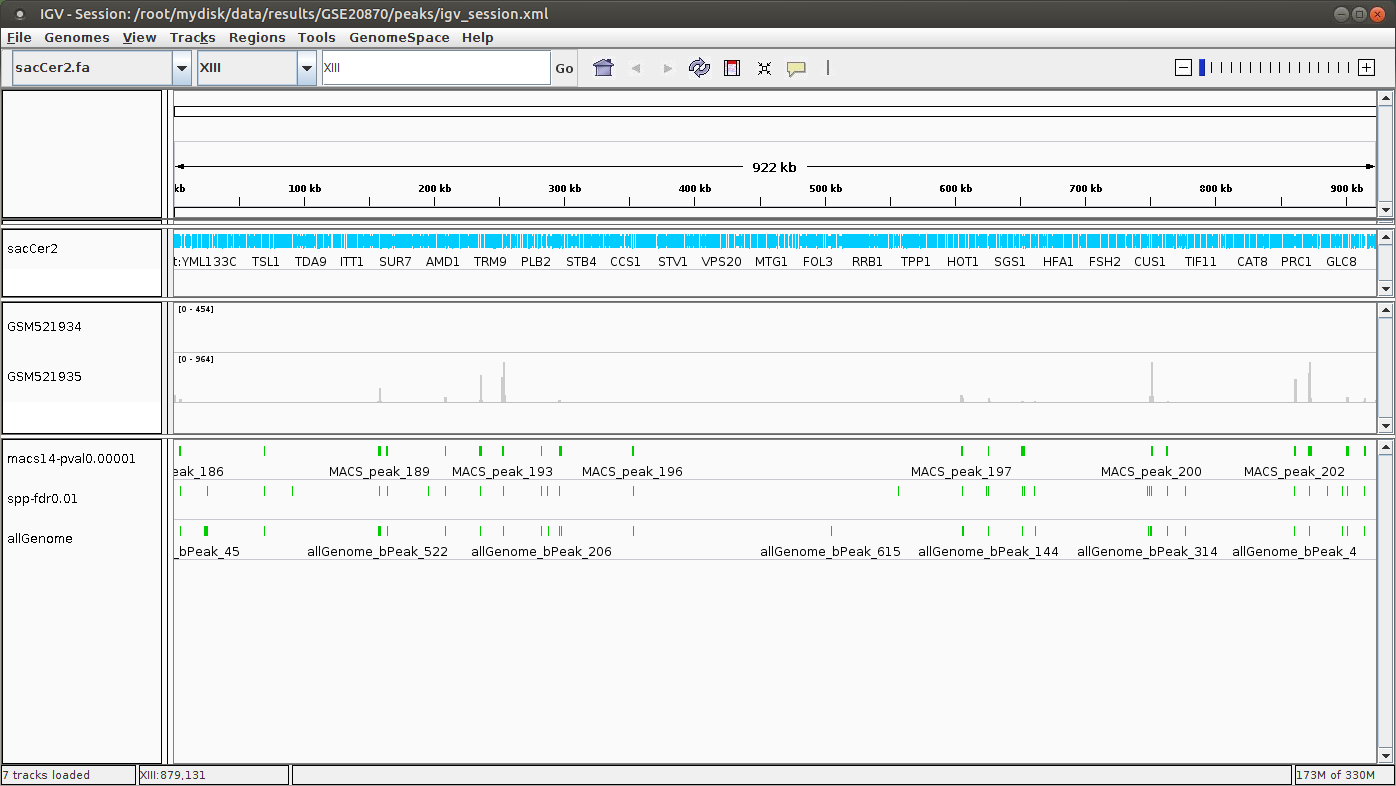
You can visualize the peaks by running IGV from the terminal.
igv
- Click “File” > “Open session…” and chose the file
/root/mydisk/ChIP-seq_SE_GSE20870/reports/peaks/igv_session.xml. - You may need to adjust the panel sizes.
5.1.7. Create your own SnakeChunks appliance
Creating a new appliance from scratch is very similar to using one. You have to satisfy the requirements described here.
If you want to manipulate data, you should also create a vDisk following these instructions.
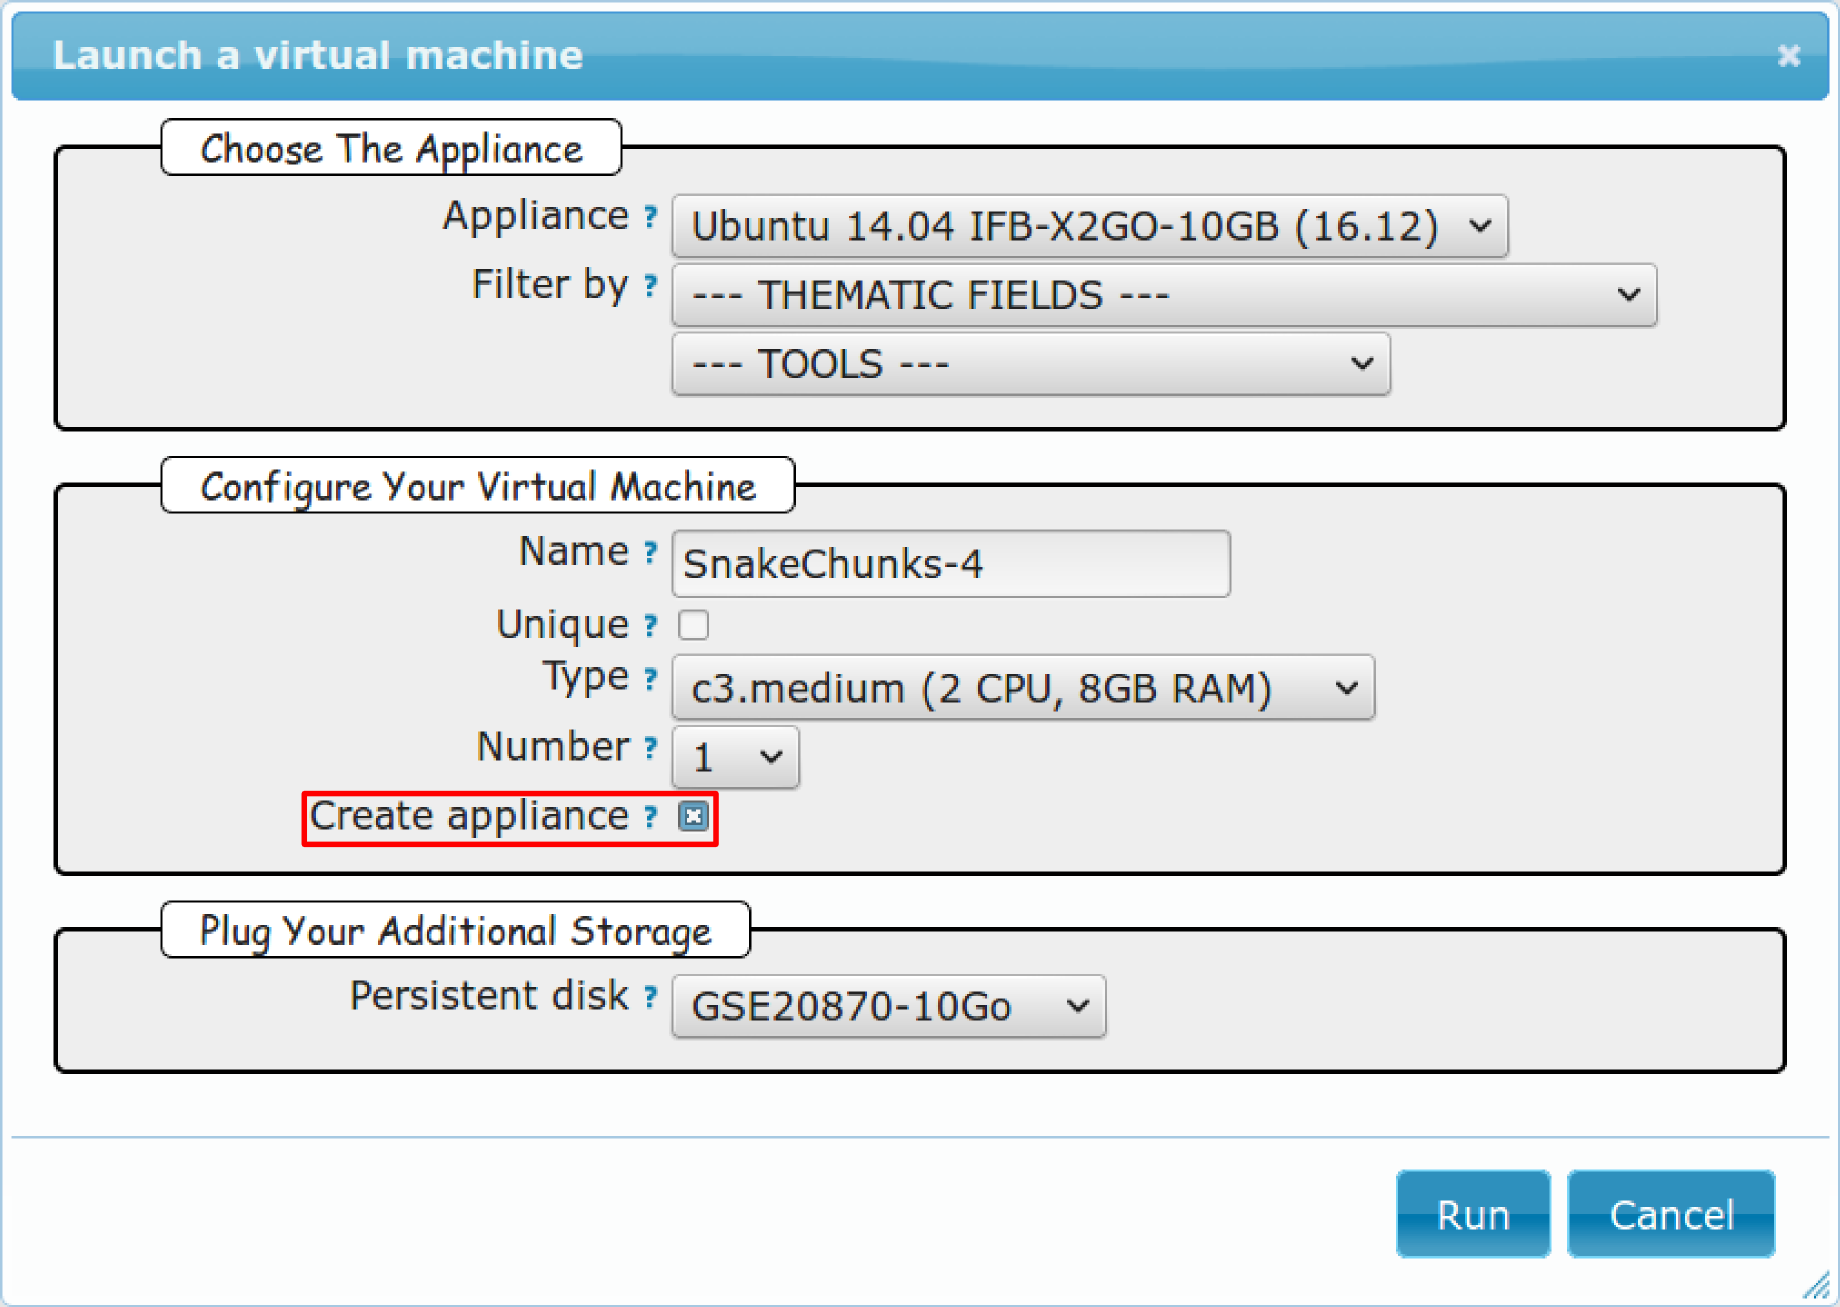
5.1.7.1. Creation of an appliance
When creating a new instance, choose a 10Go Ubuntu appliance and check the Create appliance option:
- Click New Instance button.
- Choose appliance Ubuntu 14.04 IFB-X2GO-10GB in the drop-down menu.
- Name your VM.
- Choose the amount of CPU and RAM to grant the VM.
- Check the box Create appliance.
- Attach the vDisk.
- Click Run.
The new instance should appear in orange bold fonts in the dashboard.
You can connect to the instance through ssh as shown in previous sections.
5.1.7.2. Get the SnakeChunks repository
wget -nc https://github.com/SnakeChunks/SnakeChunks/archive/4.0.tar.gz
tar zvxf 4.0.tar.gz
5.1.7.3. Run makefile to install the dependencies
The SnakeChunks library contains a makefile that installs most of the dependencies required to execute the snakemake workflows. You can also install tools manually, following these instructions.
The execution of the makefile may take a while (up to 30mn-1h), mostly because of the python libraries that are necessary to several NGS tools.
Then you should source the .bashrc in order to update the $PATH accordingly.
make -f SnakeChunks-4.0/scripts/makefiles/install_tools_and_libs.mk all
source ~/.bashrc
If you want to install the x2go server on the VM for visualization purposes, as shown here, you can also execute this rule:
make -f SnakeChunks-4.0/scripts/makefiles/install_tools_and_libs.mk add_repos desktop_and_x2go
You should now be able to execute the example workflow by following instructions from here.
In order for your appliance to remain persistant and be available to other users on the IFB cloud, you should contact an admin.
5.2. Docker
Docker is an open-source project that automates the deployment of applications inside software containers. Source: Wikipedia.
Diagram of Docker containers compared to physical and virtual machines.
5.2.1. Get started with Docker!
5.2.1.2. Install Docker on your local host (Linux)
Instructions for a linux install can be found here, along with mac and windows instructions. A useful script is availalable here for a debian install.
You can also install it on Ubuntu 14.04 (64bits) typing the following:
#sudo apt-get update
sudo apt-get -y install docker.io
sudo usermod -aG docker <username>
You should now log out and in again from your Ubuntu session. This short procedure was tested in a virtual machine under VirtualBox (see corresponding tutorial).
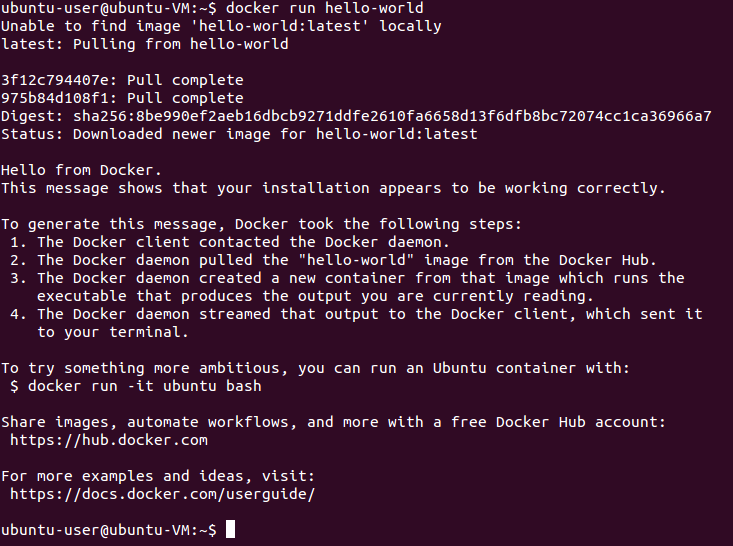
You can test whether docker works properly:
docker run hello-world
NB: it seems qwerty keyboard keeps popping up after docker install. Switch back to azerty:
setxkbmap fr
5.2.1.3. On Mac OSX
- Install docker
https://docs.docker.com/engine/installation/mac/
- Open the application Docker Quickstart Terminal. This open a new terminal window and launches the docker daemon.
- Get the gene-regulation docker
docker pull rioualen/gene-regulation:0.3
- Check the list of docker images available locally
docker images
- Start the gene-regulation image. The option
-itspecifies the interactive mode, which is necessary to be able using this VM
docker run -it rioualen/gene-regulation:0.3 /bin/bash
You are now in a bash session of a gene-regulation docker. In this session, you are “root” user, i;e. you have all the administration rights. You can check this easily:
whoami
- Check the disks available on this docker
df -h
Currently, your docker can only access its local disk, which comes with the VM. Beware: any data stored on this local disk will be lost when you shut down the gene-regulation docker.
- Exit and get back to your gene-regulation container
If you exits your shell session, the docker will still be running.
exit
You are now back to the host terminal.
Check the currently active docker containers (processes).
docker ps -a
Note that you can run several containers of the same image. Each active
container has a unique identifier which appears in the first column when
you run docker ps (e.g. faff5298ef95). You can re-open a running
container with the command
docker attach [CONTAINER_ID]
where [CONTAINER_IDR] must be replaced by the actual ID of the
running docker container (e.g. faff5298ef95).
- Shutting down the container
We will now shut down this image, and start a new one which will enable you to store persistent data.
docker stop [CONTAINER_ID]
- Starting a docker container with a shared folder.
500 docker pull rioualen/gene-regulation:0.3 501 mkdir -p ~/gene-regulation_data/GSE20870/GSM521934 ~/gene-regulation_data/GSE20870/GSM521935 502 cd ~/gene-regulation_data/GSE20870/GSM521934 503 wget ftp://ftp-trace.ncbi.nlm.nih.gov/sra/sra-instant/reads/ByExp/sra/SRX%2FSRX021%2FSRX021358/SRR051929/SRR051929.sra 504 cd ~/gene-regulation_data/GSE20870/GSM521935 505 wget ftp://ftp-trace.ncbi.nlm.nih.gov/sra/sra-instant/reads/ByExp/sra/SRX%2FSRX021%2FSRX021359/SRR051930/SRR051930.sra 506 mkdir ~/gene-regulation_data/results/GSE20870 507 mkdir -p ~/gene-regulation_data/results/GSE20870 508 docker pull rioualen/gene-regulation:0.3 509 docker run -v ~/gene-regulation_data:/data -it rioualen/gene-regulation:0.3 /bin/bash
- Running the snakemake demo workflow on the docker container
ls /data
ls /data/GSE20870/
ls /data/GSE20870/GSM521934/
exit
ls /data
source ~/bin/ngs_bashrc
snakemake -s scripts/snakefiles/workflows/factor_workflow.py -np
history
snakemake -s scripts/snakefiles/workflows/factor_workflow.py -np
5.3. VirtualBox
5.3.1. Creating a virtual machine (VM)
5.3.1.1. Creating a VM under VirtualBox software
5.3.1.1.1. Requirements
Virtualbox software
We used VirtualBox 5.0.2, downloadable from https://www.virtualbox.org/ or to be installed manually:
sudo apt-get install virtualbox-5.0
VirtualBox extension pack can be requested (eg. for handling USB2.0, see ‘errors’ section).
wget http://download.virtualbox.org/virtualbox/5.0.2/Oracle_VM_VirtualBox_Extension_Pack-5.0.2.vbox-extpack
Ubuntu image
In this tutorial we used Ubuntu 14.04.5, latest long-term supported version.
wget http://releases.ubuntu.com/14.04/ubuntu-14.04.5-desktop-amd64.iso
5.3.1.1.2. Virtual Box configuration
Before configuring the virtual machine, we need to tell VirtualBox how it will enable your local virtual machines to interact with their host (the operating system of the machine on which the VM is running).
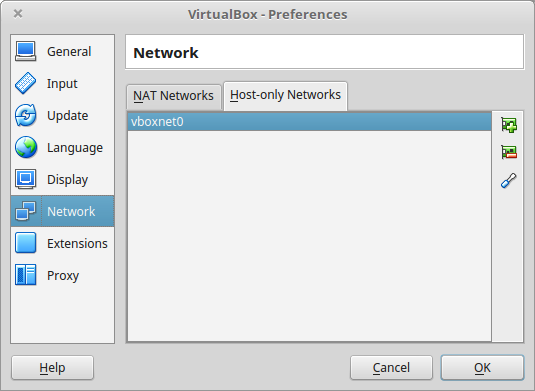
- Open VirtualBox > File > Preferences…
- Open the tab Network > Host-only Networks
- click on the “+” icon
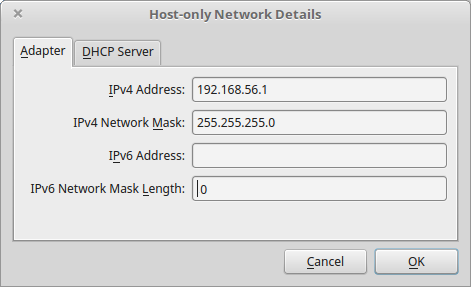
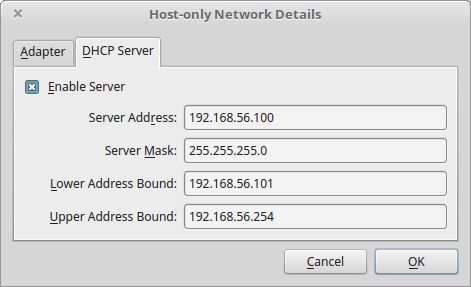
- this creates a network vboxnet0. Select this network, click on the screw driver icon (edit host-only network), and set the following options:
- Adapter tab
- IPv4 Address: 192.168.56.1
- IPv4 Network Mask: 255.255.255.0
- IPv6 Adress: blank
- IPv6 Network Mask Length: 0
- DHCP Server tab
- Check Enable Server
- Server Address: 192.168.56.100
- Server Mask: 255.255.255.0
- Lower Address Bound: 192.168.56.101
- Upper Address Bound: 192.168.56.254
5.3.1.1.3. Creation of the virtual machine
- Open VirtualBox
- Click on the New button.
- Parameters
- Name and operating system
- Name: gene-regulation
- Type: Linux
- Version: Ubuntu (64 bits)
- Memory size: 2048 Mb (this can be modified afterwards).
- Hard drive: Create a virtual hard drive now.
- Hard drive file type: VDI (VirtualBox Disk Image).
- Storage on physical hard drive
- Select Dynamically allocated
- File location and size
- max size of virtual hard drive: 30GB
- click on Create button
Note: you should adapt the virtual hard drive size to your needs. Be aware that it’s difficult to extend later on, so you should aim larger than expected. Since the size is dynamically allocated, it won’t take up too much space until you fill it.
At this stage, the VM has been created and needs to be configured before installing the operating system.
5.3.1.1.4. VM configuration
In the VirtualBox main window, select the newly created virtual machine, and click on the Settings button.
General
For the desktop version of Ubuntu, it is convenient to enable copy-paste between the guest and the host.
- Select the tab Advanced
- Set Shared clipboard to Bidirectional
- Set Drag’n Drop to Bidirectional
Storage
Click on the Empty disc icon in the storage tree. Select the disc
icon on the right and fetch the downloaded .iso image (see
Requirements). Click on OK.
Network
VirtualBox offers many alternative ways to configure network communications between the virtual machine, the host machine, and the external network.
To get more information about network settings:
- VirtualBox manual page
- An excellent tutorial
We present here one possible way to configure your Virtual machine, but this should be adapted to the particular security/flexibility requirements of the network where the maching has to run.
In the VM settings, select tne Network tab. VirtualBox enables you to specify several adapters, each corresponding to one separate network access (e.g. using an ethernet card + wi-fi connection).
- click on the tab Adapter 1,
- check Enable Network Adapter
- Attached to: Host-only Adapter
- Name: vboxnet0 (this network must have been created beforehand, see above)
- click on the tab Adapter 2,
- check Enable Network Adapter
- Attached to : NAT
- click on the tab Adapter 3,
- check Enable Network Adapter
- Attached to : Bridged Adapter
- Name: choose an option corresponding to the actual internet connection of the host machine (e.g. ethernet cable, Wi-Fi, …).
You can now start the VM.
5.3.1.1.5. Operating system installation
- Welcome
- check the language settings and click on Install Ubuntu.
- Preparing to install Ubuntu
- leave all default parameters and click Continue.
- Installation type
- (leave the default) Erase disk and install Ubuntu, click Install Now.
- Where are you (automatic)
- Paris
- Keyboard layout
- French - French
- Who are you ?
- Your name: gene-regulation
- Your computer’s name: gene-regulation-virtual
- Pick a username: gr
- Choose a password: genereg
- (Activate the option Log in automatically)
Restart once installation is completed.
..Once on the desktop, go to the VM menu: select Devices then Install Guest Additions CD image. Run it.
..The VirtualBox Guest Additions will provide closer integration between host and guest and improve the interactive performance of guest systems. Reboot again to see the new display.
5.3.2. Installing programs and dependencies
Once in the virtual machine, you can install the required programs from a terminal.
5.3.2.1. Get the gene-regulation repository
cd
wget --no-clobber https://github.com/rioualen/gene-regulation/archive/4.0.tar.gz
tar zvxf 4.0.tar.gz
5.3.2.2. Run makefile to install all required dependencies
This may take a while (30mn to 1h) & source the .bashrc (it’s been
updated with the $PATH for newly installed applications).
cd
ln -s gene-regulation-4.0 gene-regulation
make -f gene-regulation/scripts/makefiles/install_tools_and_libs.mk all
source ~/.bashrc
5.3.3. Executing snakemake workflow example
## Create a base directory for the analysis
export ANALYSIS_DIR="${HOME}/ChIP-seq_SE_GSM20870"
mkdir ${ANALYSIS_DIR}
## Download source data
mkdir -p ${ANALYSIS_DIR}/data/GSM521934 ${ANALYSIS_DIR}/data/GSM521935
wget --no-clobber ftp://ftp-trace.ncbi.nlm.nih.gov/sra/sra-instant/reads/ByExp/sra/SRX%2FSRX021%2FSRX021358/SRR051929/SRR051929.sra -P ${ANALYSIS_DIR}/data/GSM521934
wget --no-clobber ftp://ftp-trace.ncbi.nlm.nih.gov/sra/sra-instant/reads/ByExp/sra/SRX%2FSRX021%2FSRX021359/SRR051930/SRR051930.sra -P ${ANALYSIS_DIR}/data/GSM521935
## Download reference genome & annotations
wget -nc ftp://ftp.ensemblgenomes.org/pub/fungi/release-30/fasta/saccharomyces_cerevisiae/dna/Saccharomyces_cerevisiae.R64-1-1.30.dna.genome.fa.gz -P ${ANALYSIS_DIR}/genome
wget -nc ftp://ftp.ensemblgenomes.org/pub/fungi/release-30/gff3/saccharomyces_cerevisiae/Saccharomyces_cerevisiae.R64-1-1.30.gff3.gz -P ${ANALYSIS_DIR}/genome
wget -nc ftp://ftp.ensemblgenomes.org/pub/fungi/release-30/gtf/saccharomyces_cerevisiae/Saccharomyces_cerevisiae.R64-1-1.30.gtf.gz -P ${ANALYSIS_DIR}/genome
gunzip ${ANALYSIS_DIR}/genome/*.gz
## Execute workflow

cd ${ANALYSIS_DIR}
ln -s  ${HOME}/gene-regulation
snakemake -p --configfile gene-regulation/examples/ChIP-seq_SE_GSE20870/config.yml -s gene-regulation/scripts/snakefiles/workflows/import_from_sra.wf
snakemake -p --configfile gene-regulation/examples/ChIP-seq_SE_GSE20870/config.yml -s gene-regulation/scripts/snakefiles/workflows/quality_control.wf
snakemake -p --configfile gene-regulation/examples/ChIP-seq_SE_GSE20870/config.yml -s gene-regulation/scripts/snakefiles/workflows/ChIP-seq.wf
Congratulations! You just executed these wonderful workflows:

5.3.4. Visualizing results
5.3.4.1. FastQC
You can visualize the FastQC results using firefox or any other
navigator. Fetch the html files located in the sample directories.
Before trimming:
firefox ~/ChIP-seq_SE_GSE20870/fastq/GSM521934/GSM521934_fastqc/GSM521934_fastqc.html
firefox ~/ChIP-seq_SE_GSE20870/fastq/GSM521935/GSM521935_fastqc/GSM521935_fastqc.html
After trimming:
firefox ~/ChIP-seq_SE_GSE20870/fastq/GSM521934/GSM521934_sickle-se-q20_fastqc/GSM521934_sickle-se-q20_fastqc.html
firefox ~/ChIP-seq_SE_GSE20870/fastq/GSM521935/GSM521935_sickle-se-q20_fastqc/GSM521935_sickle-se-q20_fastqc.html
5.3.4.2. IGV
You can visualize the peaks by running IGV from the terminal.
igv
- Click “File” > “Open session…” and chose the file
~/ChIP-seq_SE_GSE20870/results/peaks/igv_session.xml. - You may need to adjust the panel sizes.
5.3.5. Export appliance (todo)
The virtual machine created with VirtualBox can be exported and saved as an appliance.
- Shut down the VM.
- In VirtualBox, open File -> Export Appliance …
- Select the VM
gene-regulation - Next >
- Save as: gene-regulation-[YYMMDD].ova
- Format: OVF 1.0
- Write Manifest File: check
- Next >
- Appliance Settings
- Name: gene-regulation-[YYMMDD]
- Product: Regulatory Genomics Pipeline
- Product-URL: -
- Vendor: Claire Rioualen, Jacques van Helden
- Version: YYYY-MM-DD
- Description: Regulatory Genomics Pipeline using Snakemake, installed on an Ubuntu 14.04 Virtual Machine.
- License: Free of use for academic users, non-commercial and non-military usage.
- Export
The appliance saved can be re-imported later on, on another computer if needed.
5.3.6. Import appliance (todo)
In VirtualBox, click menu File > Import appliance > fetch OVA file.
Note: there is apparently a bug with the export of VMs under VirtualBox 5.0. If you get this error when launching the imported file:
A new node couldn’t be inserted because one with the same name exists. (VERR_CFGM_NODE_EXISTS).
There is a workaround: go to the imported VM settings, to the USB tab, and untick “enable USB Controller”. You should now be able to start the VM.
5.4. Conda
TODO